| Ballos | |||||||||
|---|---|---|---|---|---|---|---|---|---|
| File:Ballos.gif | |||||||||
| Portraits | |||||||||
| |||||||||
| Sprites | |||||||||
| |||||||||
| |||||||||
| |||||||||
| Information | |||||||||
| Location | Seal Chamber (Sacred Grounds) | ||||||||
| Health | 3808 total HP | ||||||||
| Health values | |||||||||
| First form - 1000 Second form - 800 Third form - 808 (101 per eye) Fourth/final form - 1200 | |||||||||
| Credits description | |||||||||
| Hate and madness given flesh | |||||||||


Ballos (ボロス Borosu) is an antagonist and final boss fought before Cave Story's "best" ending occurs. He was the brother of Jenka, uncle of Misery and the direct creator of the Demon Crown.
Physical appearance
Ballos appears to be stout, with tan skin, a bald head, a flat, wide nose, and a wide mouth. He wears a white and green cloak with two red eyes vertically set on the front, resembling the eye on the Demon Crown. His right eye is also blood red.
Location
Ballos is located in the Seal Chamber of the Sacred Grounds. After defeating the Heavy Press, the player must bring Quote and Curly through the hole created due to the Heavy Press' fall. When they reach the bottom floor, the player should bring them to the door on the far right and enter the Long Corridor. An encounter with Ballos' puppy allows Quote and Curly to pass through the corridor and enter the Seal Chamber.
History
Ballos lived at the same time a king was ruling over the land. Like Jenka, Ballos possessed magical powers and used these for the benefit of the people. He became well-received and grew in popularity over the king. As a result of their admiration for Ballos, the king became jealous and imprisoned Ballos. Ballos was brutally tortured, to the point where he allowed his magical powers to rampage. Ballos destroyed the king and reduced the kingdom to ashes.
Jenka saw her brother's actions and eventually exiled him to the floating island, unable to kill her own brother. At some point, Ballos created the Demon Crown under Misery's forced orders. Subsequently, Misery was cursed by the Crown, along with Balrog.
Boss forms
The player fights Ballos as the final boss for the "best" ending. When approached for the first time, Ballos introduces himself to Quote and Curly, anticipating his defeat.
Ballos has three major forms, the final part being two subphases. The player is required to deplete his health metre fully for each form. When one form is defeated, the next one appears almost immediately, with a fully restored health bar.
Flying around the top of the Seal Chamber, Green Devils appear at the start of Ballos' second form and can be killed for extra weapon energy, hearts and missile ammunition. New devils replace ones that get destroyed.
First form

Ballos' first form
After Ballos speaks his final line, he stays in place and puts up his right hand. He then charges in a straight line to the player's left. His trajectory outlines a rectangle as he moves up and to the right, then back down again, though the height and length he moves at varies depending on Quote's initial position. When Ballos descends, a wave of bones moves outward along the ground. Bones will also rain from above whenever Ballos ascends.
Once a certain duration of time has passed, Ballos will begin to fly around in the air. He sends six vertical lines of white thunder to crash down on the ground consecutively, often near where Quote is placed. Crosshairs depict his targeted line of thunder. Ballos resumes attacking Quote by dashing at him if the player has not defeated him at this point.
It is not possible to obtain pickups when battling this first form. The amount of damage inflicted on Quote depends on the point of contact and during which subphase of the fight. While Ballos is dashing at him, Quote can take 10 damage, and while Ballos is standing, he can take 3 damage on contact. When Ballos is flying in the air and sending lightning bolts to the ground, each bolt can deal 10 damage if they hit Quote.
Upon depleting Ballos' health bar fully, he crashes to the ground (if in the air) with his mouth open and hands on either side of his head. He proceeds to leap into the air and through the ceiling, transitioning to the second form. At this point, green devils are seen flying around the upper half of the Seal Chamber.
Second form

Ballos - Second Form
The landing position of Ballos' second form is noted by a crosshair on the ground, located near Quote and Curly. Shortly after the signal, Ballos appears as a giant sphere that seems to represent his head. He begins to hop around in small horizontal increments. When he lands, a wave of bones ripples along the ground away from him. On every third jump, he pauses for a longer amount of time. Getting hit by the wave of bones subtracts 4 HP from Quote, while Ballos landing directly on Quote after a jump takes 16 HP.
In order to damage Ballos during this second form, the player must get Quote to shoot him through his eyeballs. Every other part of Ballos' body is invulnerable to attack. Successful shots come out the other side of his face, causing him severe damage.
It is possible to stand on the bottom right corner near Ballos' white eye. If Quote is positioned in such a manner, he can deal damage without jumping in the air. The player, however, risks getting hit by the green devils whenever Ballos jumps.
Final form


Ballos' semi-final form
Eight spiked eyeballs surround Ballos as he begins to circle counter-clockwise along the edges of the room. When he travels on the ceiling, skulls descend straight to the ground. The player has to shoot the eyeballs until they close, making them immune to damage. As Ballos moves on the ground, Quote and Curly should be positioned under a space where his eyeballs will not hit them. The main body does no contact damage, but the player loses 14 HP if they touch an eye.
Once all eyes have been shut, Ballos makes his way to the top right corner, where he drops slightly and generates eight platforms that circle around the eyeballs. 2 damage spikes start to rise from the ground and the green devils leave. Ballos' eyes and parts of his face turn red, and four of the eyeballs circling him open. Red-faced butes spawn from his body and flying red-faced archers approach from the left.
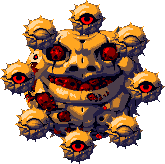
Ballos' final form
During this final phase, the eyeballs start to bounce all over the room. Eyeballs circling Ballos deal 10 damage, and getting hit by a bouncing eyeball deals 5. The player must land hits on Ballos' head, which is sometimes blocked by his mobile eyeballs and butes.
The corner of Ballos' right eye (in the view of the player) is solid, allowing Quote to stand on it. Before the final phase is revealed, Quote must take damage in order to pass through the eyeballs and land on the bottom corner. This allows the player to deal direct damage to Ballos' head minimising the risk of their attack being blocked by an eyeball. With a high-damage dealing weapon such as the Super Missile Launcher in its level 3 form, it is possible to take down this final form before butes can be spawned.
Post-battle
| SPOILER |
|---|
Once Ballos is defeated, the 290 Counter stops and the player sees the words of pain (HOT... HOT... CAN'T BREATHE... SO PAINFUL... HOT... IT HURTS...) The walls attempt to crush Quote and Curly as a last resort. Then Balrog jumps in to save the two robots, and smashes his way through the ceiling as the walls come together. Quote, Curly, and Balrog decide to live in a peaceful place together. |
| v • d • eBlood Stained Sanctuary | |
|---|---|
| General | Blood Stained Sanctuary • Statues • Curly Brace • Puppy |
| Enemies | Bute • Mesa • Rolling • Delete • Green Devil |
| Bosses | Heavy Press • Ballos |
| v • d • eEnemies and bosses | |
|---|---|
| Enemies | Critter • Bat • Door • Egg Fish • Pignon • Gravekeeper • Beetle • Behemoth • Basu • Basil • Time Bomb • Dragon Zombie • Power Critter • Jelly • Kurara • Press • Mannan • Frog • Petit • Sandcroc • Skullhead • Skullstep • Skeleton • Crow • Armadillo • Polish • Flowercub • Gaudi • Armor • Gaudi Egg • Fire Whirl • Buyobuyo Base • Buyobuyo • Fuzz • Fuzz Core • Porcupine Fish • Hoppy • Night Ghost • Midorin • Droll • Gunfish • Orangebell • Stumpy • Ravil • Bute • Mesa • Rolling • Delete • Green Devil • Curly Clone |
| Bosses | Balrog • Igor • Balfrog • Curly Brace • Omega • Rabid Toroko • Puu Black • Monster X • Core • Ironhead • Sisters • Ma Pignon • Red Ogre • Misery • Doctor • Muscle Doctor • Undead Core (Possessed Sue • Possessed Misery) • Heavy Press • Ballos • G-CLONE |